

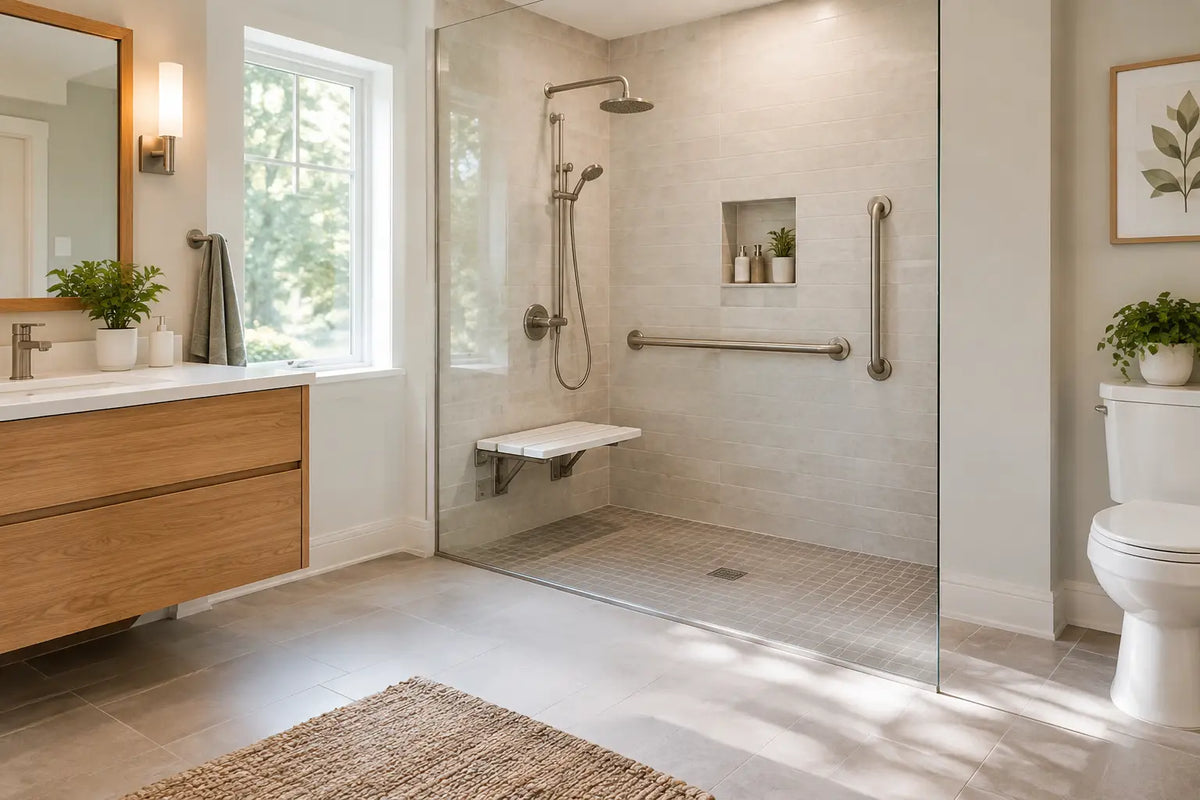
A bathroom renovation can look fully updated and still create daily obstacles: a high tub wall, a narrow vanity passage, slippery tile, or a shower control placed where it cannot be reached safely. This aging in place bathroom example shows how a well-planned room can remain attractive, practical, and easier to use as mobility needs change.
The goal is not to make a bathroom look clinical. It is to select fixtures, finishes, and plumbing components that reduce unnecessary bending, stepping, reaching, and balancing while maintaining the style and quality expected in a finished Canadian home.
An aging in place bathroom example: a practical layout
Consider a primary bathroom measuring approximately 2.7 m by 3 m. The existing room has a standard alcove tub, a 30-inch vanity, and a toilet set close to the side wall. It works for a healthy adult, but the tub threshold is difficult to step over and the tight circulation makes it harder for anyone using a cane, walker, or shower chair.
A more adaptable renovation replaces the tub with a curbless shower at one end of the room. The shower is 1.5 m wide by 1.2 m deep, with a fixed glass panel rather than a full swing door. This leaves a clear entry, reduces the need to manoeuvre around a door, and keeps the room visually open.
Across from the shower, a wall-hung vanity is installed with open space beneath. The toilet is relocated, where possible, to provide more side clearance and room in front. A comfort-height toilet with an elongated bowl makes sitting and standing easier for many users without looking out of place in a contemporary bathroom.
This is not the only workable plan. A smaller ensuite may need a compact shower base, a corner vanity, or a sliding shower enclosure. In some homes, structural limits and drain locations make a true curbless shower expensive. A low-threshold shower base can still be a meaningful improvement when floor recessing is not practical.
Start with circulation, not the fixture finish
The most expensive accessibility mistake is choosing products before confirming the layout. Before selecting a faucet finish or shower system, establish the paths through the room. Can the bathroom door open without blocking a person using a mobility aid? Is there sufficient clear floor area near the toilet, vanity, and shower entry? Can a caregiver assist if that becomes necessary?
Turning space is particularly valuable, but there is no single dimension that suits every house or user. A renovation intended to meet a specific accessibility standard should be designed and verified against the applicable local building requirements. Municipal requirements, condominium restrictions, and the scope of the project can all affect what is required.
For a private residence, planning for generous clearance is often more useful than chasing a minimum number. Keep the floor area as uninterrupted as possible. Avoid placing laundry hampers, freestanding cabinets, or deep vanity corners in the main travel path.
Door selection matters here as well. A wider doorway is easier to navigate, and a pocket door can free up floor area if the wall can accommodate it. Where a hinged door remains, consider its swing carefully. In an emergency, an inward-swinging bathroom door can be difficult to open if someone has fallen behind it.
Build the shower around safe entry and easy use
The shower is usually the highest-priority upgrade in an aging-in-place bathroom. A curbless shower creates the smoothest entry because the bathroom floor transitions directly into the shower area. It requires coordinated waterproofing, proper floor slope, drain placement, and often changes to the subfloor or framing. This is a technical installation, not simply a tile selection.
A linear drain can allow the floor to slope in one direction and supports a clean, modern appearance. A centre drain may be more economical in some layouts, but requires floor slopes from several directions. Either choice can work when installed correctly.
Specify a slip-resistant floor tile suitable for wet areas. Small-format tile provides more grout joints for traction, while certain textured porcelain tiles offer grip with a larger format. Very polished tile may suit a powder room but can be a poor choice for a shower floor.
Controls should be reachable from outside the direct spray zone, ideally near the shower entry. A thermostatic valve or pressure-balancing shower valve helps maintain more consistent water temperature when other fixtures are used elsewhere in the home. This is a practical safety feature, especially in households where water temperature changes are a concern.
Include a handheld shower on a slide bar or integrated rail, along with a fixed showerhead if desired. A handheld unit makes seated showering, cleaning, and directing water easier. Choose a quality hose length and confirm that the valve trim, diverter, rough-in valve, and shower components are compatible before installation.
Add support where it will actually be used
Grab bars should be planned during the framing stage, even if they are not installed immediately. Solid blocking behind the wall at the shower, beside the toilet, and near the tub or shower entry makes future installation safer and simpler. Decorative towel bars are not designed to support body weight.
A properly installed grab bar can be discreet. Many current options are available in finishes that coordinate with faucets, shower trim, and accessories. Some combine a grab bar with a toilet paper holder, shelf, or towel rail. The product still needs to be rated for the intended use and secured to suitable backing.
A built-in shower bench is helpful for users who need to sit while bathing or dressing. It does require floor space, so it may not be right for every compact shower. A fold-down seat provides an alternative where clear standing room is needed most of the time. Position the bench so the handheld shower and controls are within reach.
Select fixtures that reduce strain
A wall-hung vanity can create knee clearance for a seated user and makes the floor easier to clean. The mounting structure must be suitable for the vanity weight, countertop, sink, and everyday use. If a floor-mounted vanity is preferred, choose shallow cabinet depth and drawers rather than low, hard-to-reach storage shelves.
A single-lever faucet is generally easier to operate than separate hot and cold handles. Touchless faucets can be useful, though they introduce batteries or electrical requirements and may need more deliberate servicing. For a main bathroom, simple, dependable controls are often the better long-term choice.
Consider the sink rim height, mirror placement, and lighting as one group. A mirror extending lower on the wall works for standing and seated users. Bright, layered lighting at the vanity reduces shadows for grooming tasks. Recessed ceiling lights alone often leave the face in shadow, while properly positioned vanity lighting gives a clearer result.
For the toilet, look beyond colour and bowl shape. Comfort-height models are popular because they reduce the distance of sitting and standing. However, they are not automatically ideal for every person, particularly shorter users. Test the height when possible, and leave enough space for a stable grab bar installation on the appropriate side.
Plan the plumbing before walls are closed
An accessible bathroom often changes fixture locations, and each move affects drain, vent, and water supply routing. A curbless shower may require drain work below the floor. A wall-hung toilet requires an in-wall carrier system. A wall-mounted faucet needs its rough-in body positioned before tile and wall finishes are installed.
This is where product specification needs to be precise. Confirm rough-in requirements, valve compatibility, drain size, centre-to-centre measurements, electrical needs for bidet seats or smart toilets, and access panels for serviceable components. Premium fixtures from recognized brands can offer durable finishes and replacement-part availability, but even the best fixture needs the correct valve and installation method behind the wall.
Bidet seats can be a valuable addition to an aging-in-place plan. They support personal hygiene for users with limited reach or dexterity, and many models include heated seating, adjustable wash functions, and night lighting. They also require consideration of a nearby electrical connection, toilet shape compatibility, and local installation requirements.
Make the room adaptable, not overbuilt
Not every bathroom needs every accessibility feature on day one. For many homeowners, the smart approach is to build in future flexibility: wider pathways, reinforced walls, a low or no-threshold shower, practical lighting, and easily operated fixtures. These choices improve everyday comfort now and preserve options later.
A well-executed aging-in-place bathroom is simply a bathroom that asks less of the person using it. Start with the layout, select compatible fixtures and rough-in components, and give the installer a complete plan before the renovation begins.


